 Yesterday our neighbors came by with a little baby they wanted us to adopt. It was a baby turtle and they wanted to make sure he got a good home. The boys were way excited to have a pet and after much discussion we decided to name him Mylo. We found a good place in the backyard for him to live and he seems happy there. I told the boys he will be hibernating soon and that turtles don't come out very often, just to get food and water and explore a little. But they are still really excited for Mylo to live with us. And Mylo will be the only pet these boys will ever have.
Tuesday, September 28, 2010
Our new baby
Yesterday our neighbors came by with a little baby they wanted us to adopt. It was a baby turtle and they wanted to make sure he got a good home. The boys were way excited to have a pet and after much discussion we decided to name him Mylo. We found a good place in the backyard for him to live and he seems happy there. I told the boys he will be hibernating soon and that turtles don't come out very often, just to get food and water and explore a little. But they are still really excited for Mylo to live with us. And Mylo will be the only pet these boys will ever have.
Friday, September 24, 2010
"Mom there was a skull in that cave!"
Over Labor Day weekend I insisted we do something outdoorsy and fun. I wanted to be in nature and get out of the heat so we went to Mt. Charleston to go hiking. I packed a lunch and snacks and drinks and we piled the kids in the car and headed off. "Where are we going?" Dave asked me as we were half way up the mountain. "I don't know. Let's just drive until we see a hiking path," was my reply. Dave hates when there is not a plan, but he didn't say anything and he kept driving. Then I saw it. The Robber's Roost sign. My dad had told me about it before. An easy hike for the kids with a cave at the end. We parked the car and got out, walked across the street and started our hike. The weather was amazing, the air was cool and it was beautiful up there. We told the boys to look around and notice all of the things around them. I noticed how easy it was to go on a family hike now that Logan can walk, now that he wants to walk and no longer wants to be held or carried. It was fun and enjoyable and at the end there was a cave. Colin wanted to go into the cave very badly; Trevor, not so much; Logan, not at all. Colin went into the little cave and looked around and claimed he saw a skull in there. Trevor looked in but came right back out. As we looked around and then found a spot to eat our lunch I was happy. We had fun with the boys and I had fun watching them. I love the way they interact with one another, the way Dave imagines and plays with them. I love that they are buddies and that they like playing with one another (most of the time) and that they help one another out. That day was not super planned out, it was not some big, elaborate end-of-the-summer trip. It was small and simple and sometimes that is just what we need.


Tuesday, September 21, 2010
Light
 On the second day of school Trevor had a meltdown in class. His teacher called me to talk about it and I started to worry that it was going to be a terrible year with him getting into trouble and not liking school. When he came home that day I sent him to his room for a time out for the way he talked to his teacher and told him I'd come and talk to him later. I was upset with the way he acted at school but I knew I had to approach this situation in a way that would make things better and not worse. After saying a quick prayer, I spent some time thinking about what I needed to talk to Trevor about. And then it came to me. I needed to remind Trevor of who he was. When I went into his room to talk to him he was a lot more calm and I knew he was ready to listen. After talking about what is and is not appropriate at school I told Trevor what I thought he needed to hear. I told him that when he was a baby and his dad gave him his baby blessing he said something so special that I have never forgotten it. He said that Trevor would be a light to the people around him and that people would be happy just by being around him. I told Trevor what it meant to be a light and told him that he needed to smile and be happy so that the rest of his class would be happy too. The next day Trevor came out of school smiling. He said, "Mom, I smiled today and I let my light shine!" He told me not all of the kids smiled back at him, but I told him that he just needed to keep doing what he knew was right and being a good boy. And he has. Sometimes I think we all just need a little reminder of who we are and what it is that makes us "shine".
Friday, September 17, 2010
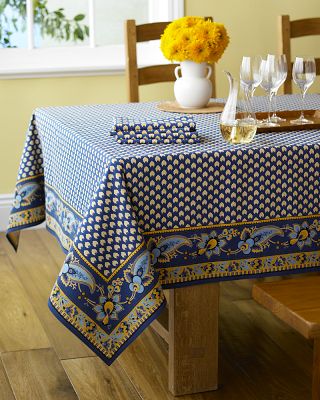
Provence fabric
When Dave and I went to France we visited the area known as the French Riviera or Provence France. It's the area close to Italy, right along the Mediterranean. One of the things I remember about that trip and that area was the amazing fabric I saw. Everywhere we went, on the streets, at the market, there would be these racks of fabric for sale. They were beautiful and bright, colors of blue, yellow, red and green. I loved seeing them and I kick myself for not buying something when we were there. But Williams-Sanoma has table cloths that remind me exactly of the fabrics I saw on the streets of Nice. I often look at them online and dream of the day I can throw one of them over the table in my kitchen or dining room. Now that we are renting a house I keep thinking about how I want to decorate when we get a house of our own. I have always loved yellow and blue, but lately my eyes have wandered to red as well. How well these primary colors go together. How fun to have a bright and cheery kitchen. I am not at all good at home decorating nor am I crafty at all, but in my head I can see a cute kitchen with these colors. Maybe someday. It's fun to look and imagine, it's fun to plan and discover all of the things you like and want. And it will be fun, once we have a house, to get on with the decorating.


Saturday, September 11, 2010
If you don't have it, make it!
Dave is gone all day today (and all night) for Youth Conference, so I invited myself over to my mom's for dinner. I told her I would bring dessert and I wanted to try something easy and new. I recently came across a new recipe blog that I love. Easy and simple recipes, but creative and fun. It's call See Jane in the Kitchen. I have a link to it on my favorite blogs. The other day I ran across a recipe called Fudge Cake Bars. It looked so good, but when I read the recipe I realized I had everything to make the bars except for sweetened condensed milk. Then, by some miracle, I came across a post on Everyday Food Storage that showed how to make your own sweetened condensed milk. Someone was trying to tell me to make these bars. So today I set out to make the milk and then the bars. So easy and simple and I did not even have to go to the store! Hooray for food storage and for smart girls who share their recipes.
Sweetened Condensed Milk:
1 Cup powdered Milk
1 Cup Sugar
1 Tablespoon Butter
1/2 Cup boiling water (put in microwave for 45 seconds to bring to boil)
Mix everything in a blend and blend until mixed well. (I had to scrape the sides of the blender a few times to get it all combined)
Fudge Cake Bars:
1 yellow cake Mix (I am sure you could use any flavor, so experiment!)
2 eggs
1/2 Cup Oil
1 recipe (or 1 can) sweetened condensed milk
1 Cup Chocolate Chips (I thought of using 1/2 peanut butter chips, but I thought about it too late. I am sure any kind of chips would work)
Combine Cake mix, eggs and oil. Pre ss 2/3 mixture into a greased 9x13 pan. In a microwave safe bowl microwave milk and chocolate chips for 30 seconds. Stir until melted or microwave another 30 seconds and stir again (I only had to do it once) Pour over crust. Sprinkle rest of crust over chocolate. Bake at 350 for 20 minutes until golden brown. (The original recipe says these freeze well.)
ss 2/3 mixture into a greased 9x13 pan. In a microwave safe bowl microwave milk and chocolate chips for 30 seconds. Stir until melted or microwave another 30 seconds and stir again (I only had to do it once) Pour over crust. Sprinkle rest of crust over chocolate. Bake at 350 for 20 minutes until golden brown. (The original recipe says these freeze well.) I could not resist and I had a small piece right from the oven. Super yummy! Next time chocolate cake mix and peanut butter chips!
Subscribe to:
Comments (Atom)